Have you considered growing peas in your garden? Learn how to grow peas from seed through harvest and try it out in your garden this spring!
Peas are one of the most anticipated of all our garden crops. Maybe because they are one of the first things to be harvested after a long winter or maybe because a pea eaten fresh from the garden is one of the tastiest things you can eat.
This site contains affiliate links. If you make a purchase using one of these links, I may earn a commission. Please see my disclosure page for more information about cookies collected and our privacy policy.
But for whatever reason, I think peas are a must in any garden.
Peas are a cool weather crop and are planted fairly early in the spring. When we lived in East TN, I shot for a February 15th planting date. Here in the mountains of North Carolina, I plant in early March.
Keep reading to learn how to grow your own peas!
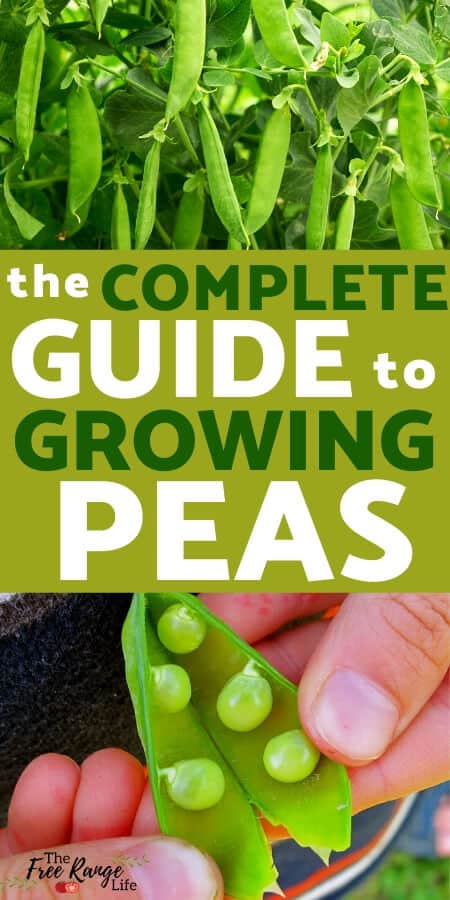
Growing Peas: From Seed to Harvest
Peas are very easy to grow from seed and are most commonly sown directly into the ground.
I personally like to sprout the pea seeds before I plant them. I do this to ensure good germination rates under optimal conditions.
Depending on the current conditions of the soil- too dry, cool, hot, etc- the seeds can be a little temperamental when it comes to germinating and I don’t like holes in my pea rows. I want as many plants as I can get in there!
When Can You Plant Peas in the Ground?
Peas are a cold weather crop. They thrive in cool weather and hate hot temperatures.
You can plant peas in the ground as soon as the soil can be worked in the early spring or late winter, depending on your growing zone.
Since you should be growing peas early, it’s often best to prepare your garden beds in the fall so they are ready to go as soon as the ground has thawed. This is typically 4-6 weeks before your last frost date.
A good bed for growing peas will have well drained soil with added compost or manure. Peas don’t need a lot of nitrogen- or else you will get more foliage and less pods.
The soil temperature should be at least 45 degrees when you plant you pea seeds. And you should keep the soil evenly moist to ensure a good germination rate.
Some gardeners like to plant peas in raised beds since the soil temperature will warm faster, but they grow great in in-ground rows too.
Peas can take light frost and snow cover, so it’s okay if it gets cold after they are planted, though if you expect a hard frost after your peas have sprouted, you may want to give them a good cover of straw or a fabric row cover to protect them.

If you are sowing direct, simply drop your pea seeds into the ground about 1 inch down and cover lightly with soil.
Plant your pea seeds 2 inches apart in rows 12- 18 inches apart. I have also have good luck growing peas in double rows (3-4inches apart) with each double row about 24 inches apart.
If you choose to pre-spout your pea seeds you can simply put a couple of inches of soil in a container- I like to use leftover Clementine Orange boxes- water it well and press the peas into the soil about an inch apart.
You can keep them inside in a sunny spot or outside, if you don’t have chickens that will gobble them up. Just be sure to keep them moist.
They should sprout fairly quickly and be ready to go in the ground in a couple weeks. They don’t have to be large, just have 2 or so inches of growth on them.
I have also left them like this way too long and they still transplanted fine, it was just more of a tangled mess to take apart before planting!
When your pre-sprouted peas are about 2 inches tall, transplant them to the garden in the same spacing I mentioned for seeds above.
Related Reading: 5 Tips for Starting Seeds Indoors
Pea Varieties to Try:
There are 3 basic kinds of peas you can grow in your garden. They are:
Snow Peas: Peas with flat, edible pods. The peas stay very small and tender. The entire pea- pod and all- are eaten together.
Sweet Peas: Peas with inedible pods and larger full-sized peas. Must be shelled before eating.
Snap Peas: Peas with edible pods and full sized peas. Shell or don’t it’s your decision!
Here are some varieties to try:
Wando Pea: Sweet pea with vines that reach 24-32″ tall, gives 3-4″ pods with 6-8 dark-green peas. Reliable grower in the south. Great for freezing.
Maestro Garden Pea: Medium sized, sweet peas. Pods often hold 12 peas each! Pea vines reach up to 36”.
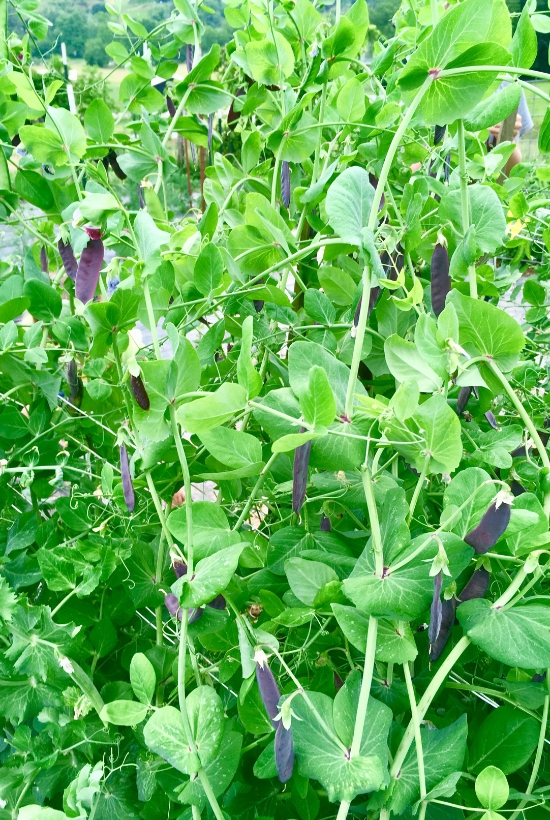
King Tut Purple Pea: What’s better than a purple podded pea?! These peas also grow and taste great!
Remember, with all varieties, pick them young so they are sweet and tender!
How to Care for Growing Peas
Growing peas is super easy. They don’t require much in the way of care and will happily grow under most conditions.
Pea plants do need water, but only if it is very dry. You don’t want to rot the seeds or roots.
Pea plants have shallow roots so be careful if you need to weed around them. Using mulch can help reduce the need to weed and disturb the roots.
How Tall Do Peas Grow?
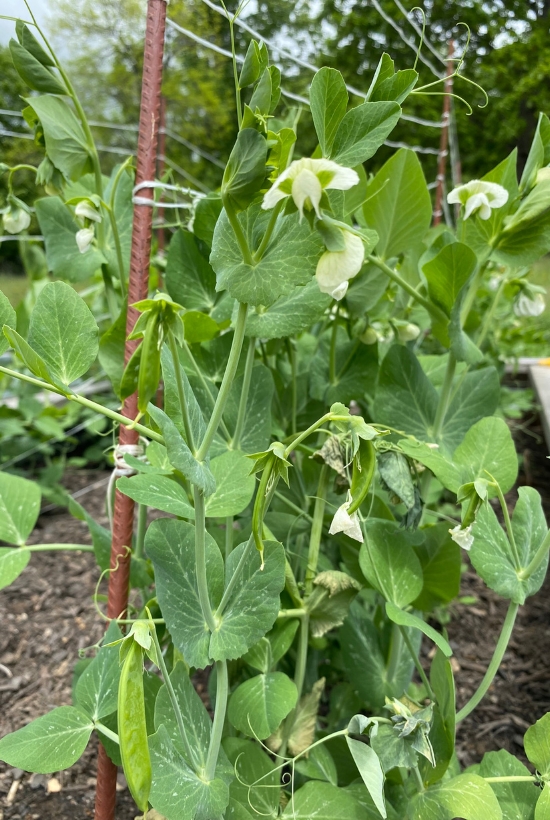
Peas are a vining plant and they can grow fairly tall, depending on the variety.
On average pea vines will get between 2 ft and 5 ft tall.
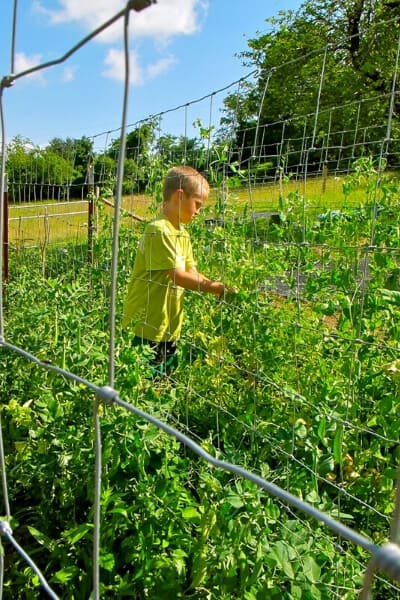
Peas need something to grow up- like a trellis, net, or fence.
Some pea varieties will tell you they don’t require staking, but even those will do better with some support both for the health of the plant and ease of picking.
I have used many, many things over the years as support. I have made bamboo teepees wrapped with twine, wire fencing on t-posts, purchased pea fence, leftover deer/bird netting hung over posts and one year the boys collected a bunch of long sticks to stab into the ground in various places.
My favorite trellis for peas is wire fencing. It is the easiest to pick from and the pea plants could grow much taller, which means you can fit more plants in a smaller space.You can read more about if peas need a trellis to learn about the benefits of staking and support.
TIP: Since peas grow early in the season AND they are nitrogen fixing, plant something else that needs staking after pea season is done. Like cucumbers!
You can get some trellis ideas here: 5 DIY Cucumber Trellis Ideas. They’d be perfect for early peas and mid season cucumbers!
Related Reading: How to Grow Vertically in Your Garden
Around the last frost date you should start to see blossoms popping up on your plants. They start off slow but then come in fast.
We usually go from picking one or 2 a night to picking basket fulls in a matter of a week. You will know they are ready to pick when you can start to feel the individual peas inside the pods.
Don’t wait too long to pick them, as the smaller ones also tend to be the sweetest. Plus the more you harvest the more your peas will produce!
Plant your best garden ever with my complete planning system! You’ll get the following digital guides: Companion Planting Guide and Binder, Yearly Garden Planner AND Beneficial Insects Guide!
Troubleshooting Problems Growing Peas
Peas don’t have too many pests and problems, and really the biggest issue for most gardeners is this:
Peas don’t don’t like hot weather. Once the temperatures hit the 70s the blooms will start to dwindle.
In many areas this means that pea season is quite short as temperatures can go from winter to summer in a matter of weeks.
But in terms of disease, Powdery Mildew and Fusarium Wilt can sometimes be an issue. These are both fungal diseases.
You can get a couple antifungal recipes using essential oils over on my article Essential Oils for Gardening.
Since peas grow when it’s still pretty cold, most pests aren’t an issue.
When and How to Harvest Peas
How Long Do Peas Take to Grow?
In general growing peas takes about 60-70 days- or 2 months.
As I said above, harvest starts slow and speeds up quickly. Keep your pea vines well picked to encourage more pods.
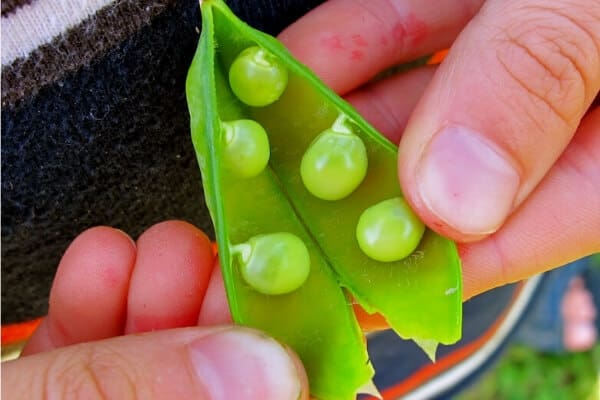
To harvest you peas, use 2 hands. One hand on the vine and one on the pod. You don’t want to accidentally tear the entire vine out of the ground!
If you are growing peas that require shelling, do that just before use or preserving.
Shelling isn’t a big deal and is something the kids actually like to help out with. We usually just sit on the floor with a basket of peas, a compost bucket and a bowl for the shelled peas and get to work!
Using Your Home Grown Peas:
My favorite way to use fresh peas is to eat them fresh. We don’t even cook them!
All of us tend to snack on peas straight from the garden- it’s hard to even get any into the house!. In fact, almost every meal in the month of May and early June will feature a handful of pea pods on the plate.
But if you are lucky enough to have excess, here’s what to do with them.
How to Preserve Peas:
You can preserve peas by freezing them or pressure canning.
- To freeze, blanch them in boiling water and boil for 1 ½ minutes. This stops them from maturing and keeps them tasting sweet and fresh.
- After 1 ½ minutes, strain out the peas and immediately submerge them into ice cold water to stop the cooking process.
- Drain the cooled peas and freeze in a single layer on a lined baking tray or place in a freezer bag. (Freezing in a single layer will allow you to remove smaller amounts from a bigger bag).
If you’d like to pressure can. You can get directions over on Homestead Acres.
Cooking Fresh Peas:
Do you want to eat your fresh peas right away? Here’s how to cook them:
- Shell your peas just before cooking. About 1 pound of pods will give 1 cup of peas.
- Place your peas into a pot of water and bring to a boil.
- Boil for 2-3 minutes or until tender.
- Drain and serve.
If you haven’t grown garden peas before, I highly recommend it. And even if you, or your children, don’t like peas, I bet the taste of a fresh from the garden pea, with its crunchy sweetness might change your mind!
Check out my other growing guides found on the 11 Easiest Vegetables for Beginners to Grow.

Those look really yummy! Good idea starting them inside, too. I may go out and grab a pack today. Thanks for the idea.
They are very yummy! One of the sweetest treats from the garden!
I loved when we did peas in our garden. Perhaps we’ll get a chance to do them this year. Thanks for linking up your tips on Tuesday Greens!
we just transplanted some peas too which are in a mini hoop tunnel and have survived hard frosts and a dump of snow! they aren’t suppose to transplant well because of the root disturbance but we didn’t have a problem! happy pea eating!
We’ve never had trouble transplanting either. Just have to be gentle with the roots :)
I love fresh peas from the garden :) Thanks for sharing this on The HomeAcre Hop!
It’s funny, my kids will only eat peas from the garden. So we get our fill of them in the early summer and that is it. I don’t even bother freezing them because they are so much better fresh :-) Last year my peas were in the ground at the beginning of March, this year there is still snow on my garden…so it will be another week or so before I plant them.
I never thought to start my peas, too. :-) Maybe I’ll go ahead and do that! There’s still time… Thanks for the tip!
Nice tutorial! I admit that I can’t leave them along long enough to produce “peas”. I love the shells when they are young. :)
if you cannot get pea seeds can you grow them from the pea pods as a seed?
If so how do you go about to grow them and what must you do in order for them to grow?
I picked all of my peas, and aren’t any blossoms , can I rip out the vines to make room for my cukes? Or will more peas grow?